
| Version 1 (modified by , 13 years ago) ( diff ) |
|---|
Table of Contents
Terrain Tab

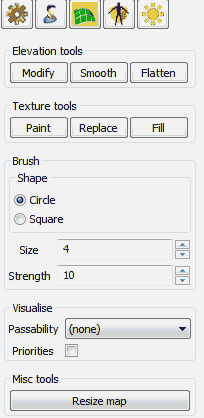
The tool and (some of the) options of the terrain tab
The modify and flatten tools have already been talked about (though the Modify was then called the Alter terrain tool, but that name is a bit too long for that button, so thus it's Modify), so here we'll focus on the Paint terrain tool. All are however affected by the brush options and while we'll use the paint tool to explain them the other tools react in the same way to most of the options. But first we'll show you the terrains, as you won't notice any difference if we'd use the same terrain that's already there to explain the other options.
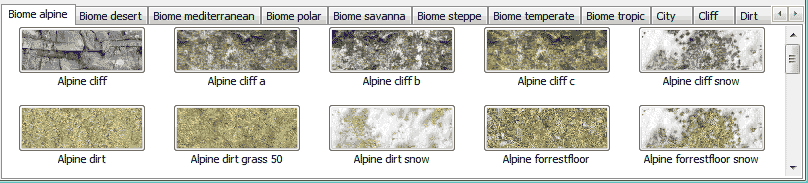
The terrains

The terrains
After clicking on the Paint terrain tool, either on the Terrain tab or from the tool bar (take a look at the tool bar to see whether it's selected as using the buttons on the Terrain tab sometimes doesn't work as well as it should), you need to select a terrain. To select a terrain is as simple as clicking on its image and then it's just to start painting.
Texture priority
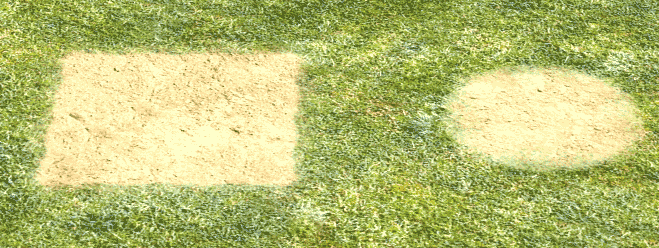
When painting terrain you can get different results by either clicking and dragging with the left or the right mouse button. The left mouse button allows you to paint in a more “dominant” style, while the right allows you to paint in a more submissive style. That might be hard to grasp when explained with words, but the picture below will allow you to understand it more easily, and you'll quickly get a grasp of it when playing around in Atlas yourself.

Two patches of a sand texture on the default grass texture, both painted with the default size 4 brush, but the left in “dominant” left mouse button mode and the right in “submissive” right mouse button mode
As you can see you get a much smaller piece of texture using the submissive mode, and that's useful when you want to paint in smaller parts of a texture on other textures.


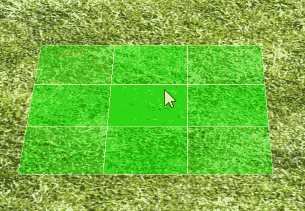
The difference between the circle and square brush shapes, displayed as more or less transparent tiles
Brush options: Shape
To give the user more flexibility in using these tools there is a choice between either a circle or square shaped brush. Both are displayed as square grids, but while the circle brush gives a smoother outline the square brush is sharper. Even at large sizes the circle brush gives a somewhat squarey look due to the fact that the terrain is based on square tiles and thus every tool that is applied has to affect these tiles and nothing else.
Brush options: Size
The size is pretty straight forward, increase the number and the size of the displayed grid, and the resulting effect of the brush, increases, and vice versa. Here the Paint terrain tool is a bit different though, as the area below the grid doesn't exactly equal the area affected, the end result is dependent on other things too, as the shape and texture priority settings also affect the final size of what gets painted. You can change the sixe both by writing directly into the text field or by clicking the up/down arrows on the right side of the text field.
Brush options: Strength
The strength option is a bit different in that it doesn't affect the Paint terrain tool at all.
The other two terrain tools (the Alter terrain tool, and the Flatten terrain tool) are affected however. The greater the strength the greater the effect, i.e. if the value is 1 you'll have to hold the mouse button for some time before seeing any result, but if the value is 100 you only have to keep the button pressed for a small amount of time before a lot happens. You can change the value both by writing directly into the text field or by clicking the up/down arrows on the right side of the text field.
Visualise
 The Visualise:Passability dropdown menu lets you choose how and if you want to preview terrain passability (whether or not a unit can walk, sail, etc over that part of terrain). The options are
- None (No passability visualisation)
- Default (Visualises passability for land units)
- Ships (Visualises passability for ships)
Attachments (8)
- brush_options_circle.png (24.9 KB ) - added by 6 years ago.
- brush_submissive_dominant.png (81.5 KB ) - added by 6 years ago.
- brush_options_square.png (22.8 KB ) - added by 6 years ago.
- misc_resize_map.png (4.5 KB ) - added by 6 years ago.
- misc_tools.png (666 bytes ) - added by 6 years ago.
- tabs_terrain.png (5.0 KB ) - added by 6 years ago.
- tabs_terrain_terrains.png (23.1 KB ) - added by 6 years ago.
- visualize_passability.png (1.0 KB ) - added by 6 years ago.
Download all attachments as: .zip