
| Version 13 (modified by , 13 years ago) ( diff ) |
|---|
Table of Contents
Part of the 0 A.D. Gameplay Manual
Setting up a game
Under Construction, in the mean time, please see the in-game manual and http://trac.wildfiregames.com/wiki/Playing0AD
Setting up a single player game

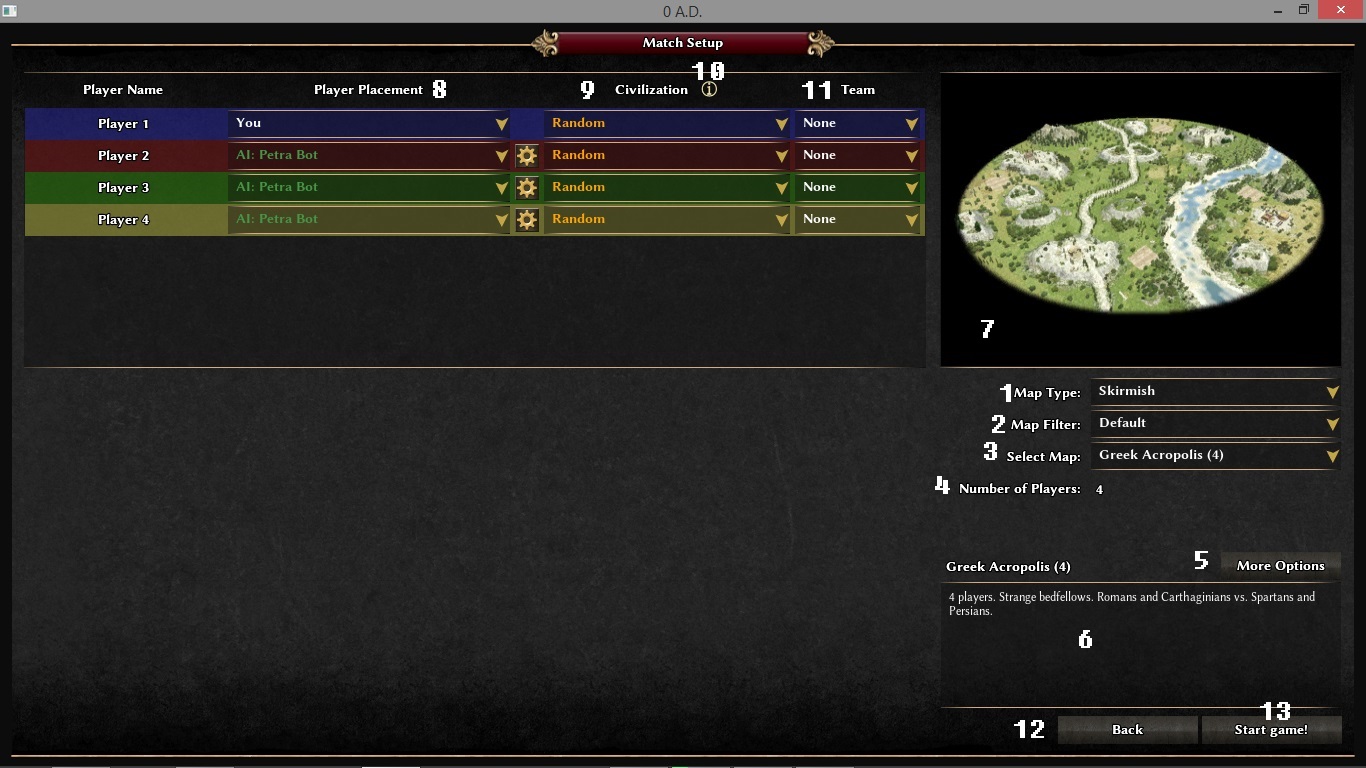
1. Change Match Type
Currently only scenario, but random maps and other game types will later be selectable from here.
2. Change Map Filter
- Default: Maps for general gameplay.
- Demo Maps: Maps which are created for demonstrating a specific purpose, rather than for general gameplay.
- Old Maps: Maps which are outdated for different reasons, might be broken or just not up-to-date.
- All Maps: Every map that is installed.
3. Select player for this slot
Can be either: You (as in you the human player), an AI, or Unassigned for no player (if there are units already on the map for that faction they will remain on the map and will attack if you get too close, but no new units will be created).
4. Change AI options
Click the 'c' to see a description of the AI as well as to set any settings provided. For the AIs provided with Alpha 4 there are no settings, but future and custom AIs might provide settings, and a description is included for all AIs included with Alpha 4.
5. Which Civilization
Displays which civilization the player in this slot will be. For now the civilization is set in the map files (more specifically in the XML file for the map), and for scenarios that's likely to remain the case as they often are set up to work with that specific civilization, but for Random Maps you will also be able to change which civilization the player who's going to play in this slot will play as.
6. More info on civilization
Click the (i) to see more info about the Civilization, both some basic historical information and information about what makes this civilization special in-game. (Currently a lot of the information is not accurate as a lot of the things it talks about aren't implemented yet, like formations, technologies etc.)
7. Which Team
If teams are set this is where it is shown which team each player is on (currently teams are set in the map file, but later in GUI, for random maps most likely here, and for scenarios most likely in Atlas). Players on the same team can't attack each other and will win/loose together.
8. Map Selection
Click on a map name to select it, and see the information in the Map Info box below. You can also move between maps in the list by using the arrow keys to move up and down.
9. Map Info
Displays info about the map. The information consists of the number of players plus any information the map creator has entered for the map. Typically a description of what the map looks like and what you should focus on.
10. Map Size
Will be relevant once random maps are implemented.
11. Reveal Map
Will there be fog-of-war/shroud-of-darkness or should all the map be displayed from the start.
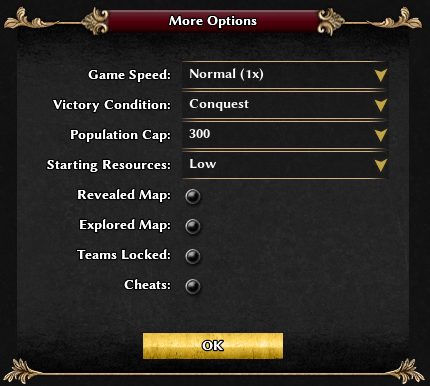
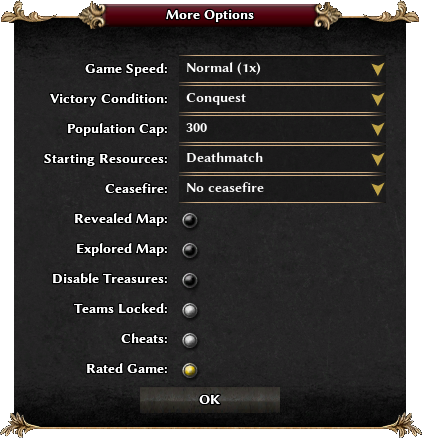
12. Victory Condition
What conditions apply for winning a match. Currently only either Conquest or None. When set to Conquest the game ends when the enemie's/enemies' units/buildings are destroyed, and when it's set to None the game doesn't end until you choose to end it.
13. Teams Locked
Currently teams are always locked, and will most likely always be for scenarios. Later you will be able to set whether or not teams should be locked or not, but diplomacy will have to be implemented first.
14. Start game!
Click here to start the game with the above settings.
15. Cancel
Click to go back to the main menu screen.
Hosting/Joining a Multiplayer game

Join or Host
Choose Join Game if there is an already existing game you want to join, or Host Game if you are the one who will host the game. Typically the one with the best internet connection should host (computer power is not as important as the load of the game is shared by all computers).
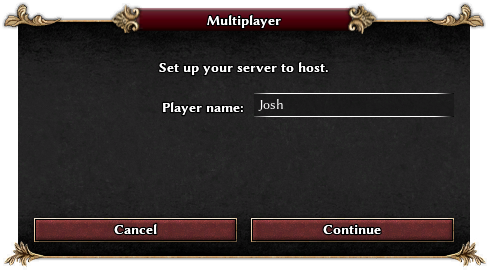
Setting up your server
Either keep the existing username or enter a new one, and then press Continue. The comes the important part of making it possible for other people to connect to your game, there's two parts to this. First you need to make sure the game is accessible from the internet, most importantly that the UDP port 20595 is forwarded (see the documentation for your router/firewall/etc for info on port forwarding), but also by whitelisting/allowing 0 A.D. access through any firewalls etc. Secondly you need to tell people who want to play your IP, you can find your IP number here for example: www.whatsmyip.org.
Joining an existing game
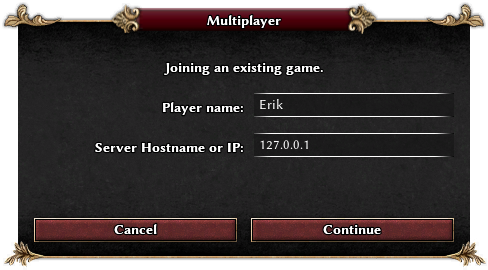
Player name: Either accept the existing username (typically the first name of the current user) or enter a new one here. Server Hostname or IP: Enter the IP address the host gives you.
Then press Continue to be taken to the Match Setup screen described below.
Setting up a multiplayer game

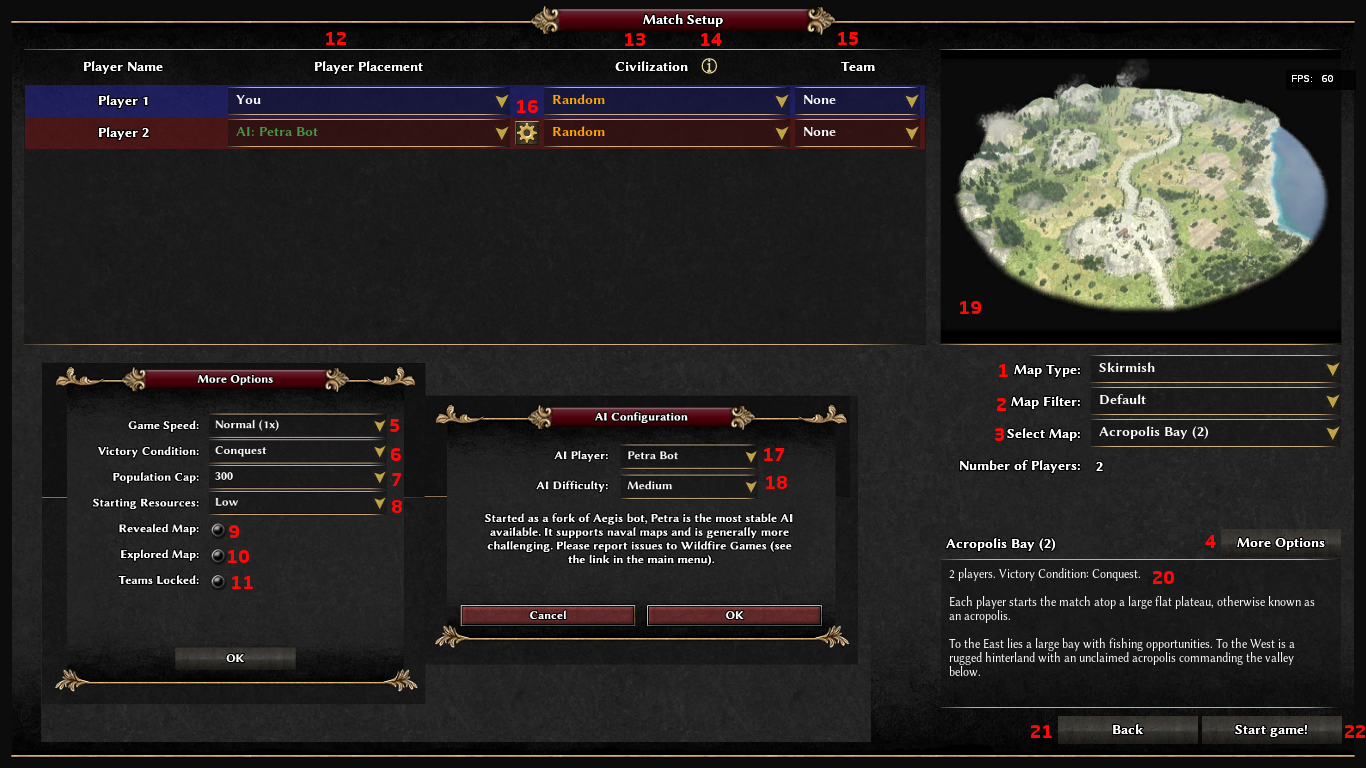
1. Change Match Type
Currently only scenario, but random maps and other game types will later be selectable from here.
2. Change Map Filter
- Default: Maps for general gameplay.
- Demo Maps: Maps which are created for demonstrating a specific purpose, rather than for general gameplay.
- Old Maps: Maps which are outdated for different reasons, might be broken or just not up-to-date.
- All Maps: Every map that is installed.
3. Select player for this slot
Can be either: You (as in you the human player), an AI, or Unassigned for no player (if there are units already on the map for that faction they will remain on the map and will attack if you get too close, but no new units will be created).
4. Change AI options
Click the 'c' to see a description of the AI as well as to set any settings provided. For the AIs provided with Alpha 4 there are no settings, but future and custom AIs might provide settings, and a description is included for all AIs included with Alpha 4.
5. Which Civilization
Displays which civilization the player in this slot will be. For now the civilization is set in the map files (more specifically in the XML file for the map), and for scenarios that's likely to remain the case as they often are set up to work with that specific civilization, but for Random Maps you will also be able to change which civilization the player who's going to play in this slot will play as.
6. More info on civilization
Click the (i) to see more info about the Civilization, both some basic historical information and information about what makes this civilization special in-game. (Currently a lot of the information is not accurate as a lot of the things it talks about aren't implemented yet, like formations, technologies etc.)
7. Which Team
If teams are set this is where it is shown which team each player is on (currently teams are set in the map file, but later in GUI, for random maps most likely here, and for scenarios most likely in Atlas). Players on the same team can't attack each other and will win/loose together.
8. Map Selection
Click on a map name to select it, and see the information in the Map Info box below. You can also move between maps in the list by using the arrow keys to move up and down.
9. Map Info
Displays info about the map. The information consists of the number of players plus any information the map creator has entered for the map. Typically a description of what the map looks like and what you should focus on.
10. Map Size
Will be relevant once random maps are implemented.
11. Reveal Map
Will there be fog-of-war/shroud-of-darkness or should all the map be displayed from the start.
12. Victory Condition
What conditions apply for winning a match. Currently only either Conquest or None. When set to Conquest the game ends when the enemie's/enemies' units/buildings are destroyed, and when it's set to None the game doesn't end until you choose to end it.
13. Teams Locked
Currently teams are always locked, and will most likely always be for scenarios. Later you will be able to set whether or not teams should be locked or not, but diplomacy will have to be implemented first.
14. Chat box
Pretty straight-forward chat. Write messages, read messages. You can send messages both by clicking on the Send button and by pressing the Enter key on your keyboard. When you first get to the setup screen the focus is on the chat box, so you can start chatting immediately, but if you click somewhere else you'll need to click back in the chat to be able to write another message.
15. Start game!
Click here to start the game with the above settings.
16. Cancel
Click to go back to the main menu screen.
Attachments (7)
-
hosting_multiplayer.png
(117.8 KB
) - added by 10 years ago.
Screenshot of multiplayer host window
-
joining_multiplayer.png
(120.1 KB
) - added by 10 years ago.
Screenshot of multiplayer join window
-
gettingstarted-#1.jpg
(263.8 KB
) - added by 9 years ago.
joining_multiplayer
- Single_Player_Setup_New.png (1.1 MB ) - added by 9 years ago.
- Multiplayer_More_Options.png (189.7 KB ) - added by 9 years ago.
- Single_Player_Setup_New.2.png (1.2 MB ) - added by 8 years ago.
- Multiplayer_More_Options.2.png (725.5 KB ) - added by 8 years ago.