
Table of Contents
- Graphics Settings
- General Settings
- Graphics Settings
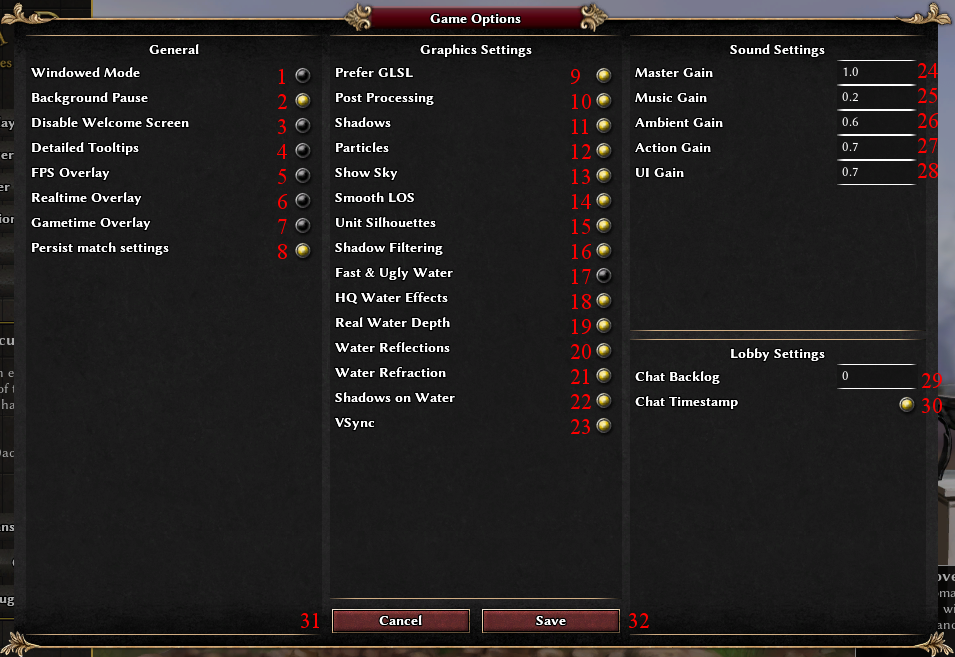
- 1. Windowed Mode
- 2. Prefer GLSL
- 3. Fog
- 4. Enable Post Processing
- 5. Shader effects
- 6. Shadows
- 7. Shadow quality
- 8. Shadow Filtering
- 9. Unit Silhouettes
- 10. Particles
- 11. Water Effects
- 12. HQ Water Effects
- 13. Real Water Depth
- 14. Water Reflections
- 15. Water Refraction
- 16. Shadows on Water
- 17. Smooth LOS
- 18. Show Sky
- 19. VSync
- 20. FPS Throttling in Menus
- 21. FPS Throttling in Games
- Sound Settings
- Game Setup
- Lobby
- In-Game
- 1. Wounded Unit Health
- 2. Batch Training Size
- 3. Chat Notification Attack
- 4. Chat Notification Tribute
- 5. chat Notification Barter
- 6. Chat Notification Phase
- 7. Attack Range Visualization
- 8. Aura Range Visualization
- 9. Heal Range Visualization
- 10. Rank icon above status bar
- 11. Detailed Tooltips
- 12. Sort resources and population tooltip
- Keyboard Shortcuts
Settings
For info on how to permanently change various game settings, see the file binaries\data\config\default.cfg (can be found in the folder where 0 A.D. is installed, which varies on different operating systems, or here : http://trac.wildfiregames.com/browser/ps/trunk/binaries/data/config/default.cfg ). To change a setting, create a new local settings file. The path varies by your OS, see GameDataPaths. Open the new file in your text editor of choice, and copy any lines you want to change from default.cfg into the new local.cfg.
Graphics Settings
Some settings you can change via the in-game menu as well. You do that by clicking on Menu, then Settings, and there check/uncheck the Enable Water Reflections, and Enable Shadows checkboxes. This can be helpful if the game is slow.
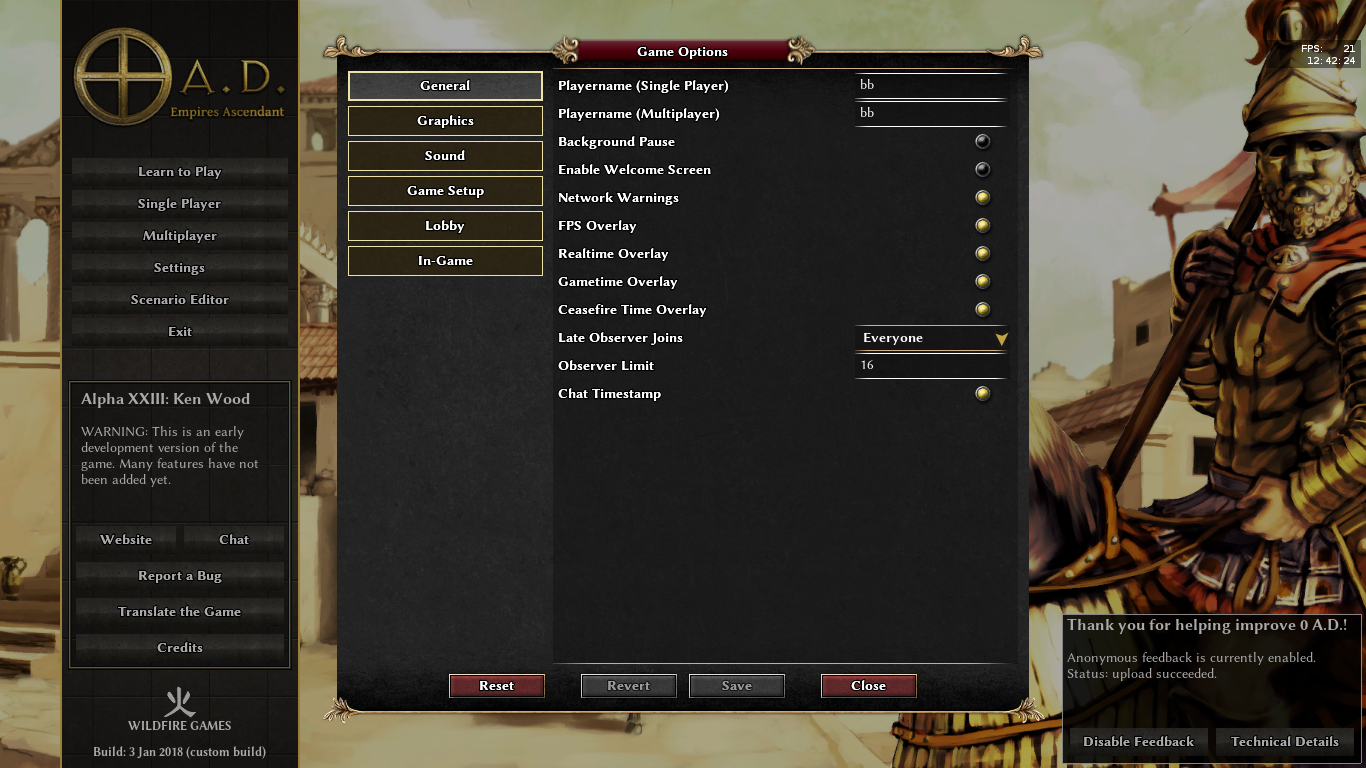
In-game Options Menu

General Settings
1. Playername (Single Player)
How you want to be addressed in Single Player matches.
2. Playername (Multiplayer)
How you want to be addressed in Multiplayer matches (except lobby).
3. Background Pause
When on if you put 0ad in the background (e.g. by pressing Alt+Tab the game will be paused.
4. Enable Welcome Screen
Displays the welcome screen at each game launch.
5. Network Warnings
Show which player has a bad connection in multiplayer games.
6. F.P.S. Overlay
Display a F.P.S.(Frames Per Second) counter on the left side of the screen.
7. Real Time Overlay
Display the clock matching your time zone on the left side of the screen.
8. Game Time Overlay
Display the elapsed time on the left side of the screen.
9. Ceasefire Time Overlay
Always show the remaining ceasefire time.
10. Late Observer Join
Allow everybody or buddies only to join the game as observer after it started.
11. Observer Limit
Prevent further observers from joining if the limit is reached.
12. Chat Timestamp
Show time that messages are posted in the lobby, gamesetup and ingame chat.
Graphics Settings
1. Windowed Mode
Toggles on/off the windowed mode, note that you will have to restart the game in order to make it work. Another solution is pressing Alt+Enter .
2. Prefer GLSL
Tick this to use OPENGL 2.1 Shaders.
IMPORTANT NOTE : If you are using an Integrated Chipset such as Intel HD Graphics, this should be set to on in order to prevent screen corruption.
3. Fog
Enable fog.
4. Enable Post Processing
Tick this to enable post-processing effects such as Bloom,HDR and depth of field.
5. Shader effects
Number of shader effects.
6. Shadows
Tick this to enable in-game shadows. This option is resource heavy, so make sure you have a decent computer.
7. Shadow quality
Shadow map resolution. High values can crash the game when using a graphics card with low memory!
8. Shadow Filtering
Smooth shadows.
9. Unit Silhouettes
Show outlines of units behind buildings.
10. Particles
Enable particles effects such as fire or smoke.
11. Water Effects
When OFF, use the lowest settings possible to render water. This makes other water settings irrelevant.
12. HQ Water Effects
Use higher-quality effects for water, rendering coastal waves, shore foam, and ships trails.
13. Real Water Depth
Use actual water depth in rendering calculations.
14. Water Reflections
Allow water to reflect a mirror image.
15. Water Refraction
Use a real water refraction map and not transparency.
16. Shadows on Water
Cast shadows on water.
17. Smooth LOS
Smooth the uncovering of the FOW (Fog Of War) so that you don't see "jumps" in the researched territory.
18. Show Sky
Displays the sky.
19. VSync
Run vertical sync to fix screen tearing.
20. FPS Throttling in Menus
To save CPU workload, throttle render frequency in all menus. Set to maximum to disable throttling.
21. FPS Throttling in Games
To save CPU workload, throttle render frequency in running games. Set to maximum to disable throttling.
Sound Settings
IMPORTANT NOTE: You have to press ENTER after setting a value in the form in order to save the parameters.
1. Master Volume
Controls the volume in general. Max is 10.0 and min 0.0.
2. Music Volume
Controls the music volume. Max is 10.0 and min 0.0.
3. Ambient Volume
Controls the ambient Sound volume (ie : nature). Max is 10.0 and min 0.0.
4. Action Volume
Controls the Unit Sound volume (ie : units chopping trees). Max is 10.0 and min 0.0.
5. UI Volume
Controls the UI (User Interface) volume (ie : button sound.). Max is 10.0 and min 0.0.
6. Nick Notification
Receive audio notification when someone types your nick.
Game Setup
1. Enable Game Setting Tips
Show tips when setting up a game.
2. Enable Settings Panel Slide
Slide the settings panel when opening, closing or resizing.
3. Persist Match Settings
Save and restore match settings for quick reuse when hosting another game.
4.Default AI Difficulty
Default difficulty of the AI.
5. Default AI Behavior
Default behavior of the AI.
6. Assign Players
Automatically assign joining clients to free player slots during the match setup.
Lobby
1. Chat Backlog
Number of backlogged messages to load when joining the lobby.
2. Game Rating Column
Show the average rating of the participating players in a column of the gamelist.
In-Game
1. Wounded Unit Health
The wounded unit hotkey considers the selected units as wounded if their health percentage falls below this number.
2. Batch Training Size
Number of units trained per batch.
3. Chat Notification Attack
Show a chat notification if you are attacked by another player.
4. Chat Notification Tribute
Show a chat notification if an ally tributes resources to another team member if teams are locked, and all tributes in observer mode.
5. chat Notification Barter
Show a chat notification to observers when a player bartered resources.
6. Chat Notification Phase
Show a chat notification if you or an ally have started, aborted or completed a new phase, and phases of all players in observer mode.
7. Attack Range Visualization
Display the attack range of selected defensive structures (can also be toggled in-game with the hotkey).
8. Aura Range Visualization
Display the range of auras of selected units and structures (can also be toggled in-game with the hotkey).
9. Heal Range Visualization
Display the healing range of selected units (can also be toggled in-game with the hotkey).
10. Rank icon above status bar
Show rank icons above status bars.
11. Detailed Tooltips
Show detailed tooltips for trainable units in unit-producing buildings.
12. Sort resources and population tooltip
Dynamically sort players in the resources and population tooltip by value.
Keyboard Shortcuts
The keyboard shortcuts can be changed with the same process outlined above, just copy the relevant line from the default.cfg file to the local.cfg and change the part after the equal sign (=) and before the semicolon (;). For shortcut key combinations edit the keys between the quotation marks (""), and use a plus sign (+) to tie together more than one key (so don't remove it unless you change a multi-key shortcut to a single key shortcut).
Some keyboards (most notably AZERTY ones) have keys where the default character isn't present in the ASCII alphabet. For those keyboards, there are special configurations needed per keyboard layout and per OS. You can find your needed configurations below.
On Linux, you should have for French and Belgian layout:
- é = World73 (or W73)
- § = World7 (or W7)
- è = World72 (or W72)
- ç = World71 (or W71)
- à = World64 (or W64)
On OSX, French layout:
- é = World0 (or W0)
- è = World3 (or W3)
- ç = World2 (or W2)
- à = World4 (or W4)
Theses special keys are not needed under Windows as the the game developer had to build a custom key manager.
Attachments (2)
-
GameOptions.png
(554.4 KB
) - added by 9 years ago.
IngameOptions Preview.
- GameOptions.2.png (1.2 MB ) - added by 6 years ago.
Download all attachments as: .zip